How to Adjust Koni Shocks for Optimal Performance
In this guide, we will provide you with step-by-step instructions on how to adjust Koni shocks for optimal performance. Koni adjustable shocks and struts offer a wide range of rebound and compression damping choices, allowing you to select the best performance level for your specific needs. Originally designed with everyday drivers in mind, Koni adjustable shocks have the added benefit of compensating for wear over time, resulting in a longer lifetime compared to non-adjustable shocks.
The guide will cover the adjustment procedures for different series of Koni adjustable shocks, including the popular Koni Sport Yellow line, as well as the Classic Red and Black shocks, coilover kits, RV shocks, and race shocks. Whether you're fine-tuning your track car or seeking the perfect balance between stability and comfort, this guide will equip you with the knowledge to adjust your Koni shocks to achieve maximum performance.
Introduction to Koni Adjustable Shocks
Koni: Between Comfort and Stability
Koni adjustable shocks are engineered to bridge the gap between comfort and stability, a crucial balance for any vehicle. They provide drivers with the ability to customize their ride to match their driving style and road conditions. When you adjust Koni shocks, you're not just tweaking a setting; you're fine-tuning the entire driving experience to enhance both safety and enjoyment.
These shocks are versatile, with settings that can be adapted for a smooth daily commute or stiffened for aggressive driving and track days. The inherent design of Koni shocks allows for easy adjustments to rebound and compression, giving you control over how your car handles and responds to different surfaces. By understanding how to adjust Koni shocks correctly, drivers can ensure their vehicle remains reliable on long trips while also being capable of spirited driving when the roads demand it.
Adjustment Direction: Clockwise: Firmer Counter Clockwise: Softer |
  |
Evolution of Koni Adjustable Shocks
The evolution of Koni adjustable shocks is a testament to the brand's commitment to innovation and quality. Over the years, Koni has continually refined its shock absorbers to meet the changing demands of both roads and racetracks. From their origins in the 1950s to the present day, Koni has focused on delivering products that offer superior handling without sacrificing ride comfort.
One key to Koni's enduring success is their use of high-quality materials and precise manufacturing techniques, which ensure the longevity and performance of their shocks. Additionally, Koni has been a pioneer in the adjustable shock market, introducing user-friendly designs that allow for quick and easy adjustments. This adaptability has made Koni shocks a favorite among professional racers and automotive enthusiasts who demand the best from their vehicles. As vehicles and driving conditions have evolved, so have Koni shocks, maintaining their status as a leader in suspension technology.
|
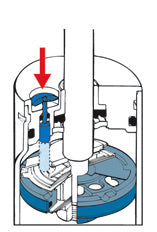
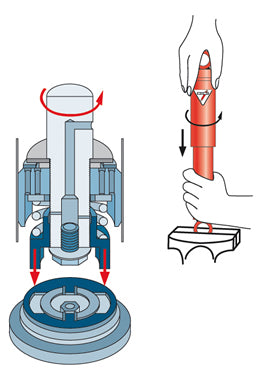
Remove the shock absorber from the vehicle and hold it vertically with the lower eye or pin attached in a vise. Use clamp plates to prevent damage. Fully collapse the shock absorber, at the same time turning the dust cap or piston rod slowly to the left (counterclockwise), until it is felt that the cams of the adjustment nut engage in the recesses of the foot valve assembly. Some shock absorbers include a bump rubber concealed under the dust cover and it must be removed prior to adjusting. The damper may have already been adjusted. Therefore check whether the shock absorber is in the adjustment position or not by keeping it collapsed and gently turning it further to the left counting at the same time the half turns until a stop is felt. Stop turning then and do not use force. Keeping the shock absorber collapsed, make 1 half turn (180 degrees) to the right (clockwise). In case of prior adjustment add the number of half the turns previously found. The total range is about 5 half turns. Pull the shock absorber out vertically without turning for at least 1 cm to disengage the adjusting mechanism. The dust cap or piston rod may now be turned freely. ADJUSTING DIRECTION Clockwise = Firmer Counter Clockwise = Softer |
  |
Koni Adjustable Shocks: Legends in Performance
Koni Sport Yellow Line
The Koni Sport Yellow line is the go-to choice for driving enthusiasts who demand the best in performance without compromising comfort. These shocks are specifically designed for sports and performance cars, offering exceptional road-holding and handling properties. The Sport Yellow line stands out with its distinctive yellow color and its reputation for enhancing the dynamics of a vehicle.
What makes the Sport Yellow shocks notable is their twin-tube design and the ability to adjust them for rebound damping. This feature allows drivers to dial in their preferred balance of comfort and performance. The adjustment process, which we will detail later, is straightforward and can be done with the shocks still mounted on the car. For those seeking a competitive edge on the track or just a more engaging drive on twisty roads, the Koni Sport Yellow shocks provide a reliable and high-performing solution.
Koni Classic Red and Black Shocks
Koni Classic Red and Black shocks cater to a different set of priorities, focusing on restoration and performance for vintage and classic cars. They maintain the essence of a vehicle's original ride quality while improving overall stability and control. The Classic line's shocks, often in the signature red or understated black color, are engineered to fit seamlessly with older car models, reflecting Koni's dedication to a wide range of automotive needs.
These shocks are not only about maintaining the classic look but also about modern performance. They incorporate Koni's tried-and-tested technology, ensuring that even classic car enthusiasts can enjoy the benefits of adjustable damping. This adjustability helps to preserve the integrity of the vintage driving experience while allowing for enhancements to ride comfort and handling. The Classic Red and Black shocks are thus a perfect blend of tradition and innovation, providing reliability and improved driving dynamics to the cars that have stood the test of time.

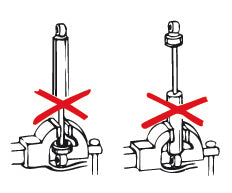
Figure 3: Do not place the shock absorber in a vise (except at the lower eye) See figure 2. General Precaution - Do not place the piston rod in a vice, nor cause damage to the rod surface.
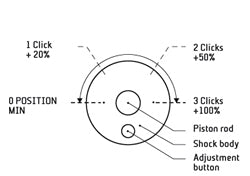
Figure 1: Move pin left or right to increase rebound forces (counter-clockwise) Rebound - Insert a pin into the slotted adjuster located at the top eye (figure 1). Moving the pin from left to right (counterclockwise) will cause the forces to increase. From the minimum or factory positions, there are 12 possible sweeps of adjustment ( 1 sweep equals 1/4 turn).
Figure 2: Turn screw from left to right to increase compression forces (clockwise)Compression - Insert a screwdriver into the lower adjustment device (figure 2). Turning the screw driver from left to right (clockwise) will cause the forces to increase. From the minimum or factory positions, there are 12 possible "clicks" of adjustment.

Fig. 2Range of Koni Adjustable Shocks
Koni's range of adjustable shocks is extensive, ensuring that there's a suitable option for nearly every type of driver and vehicle. From the acclaimed Sport Yellow line designed for modern sports cars to the Classic Red and Black series for vintage vehicles, Koni offers solutions that cater to a diverse automotive landscape. But the variety doesn't stop there.
Koni also provides specialized shocks for RVs and commercial vehicles that require heavy-duty performance, as well as a selection of race shocks for competitive motorsport applications. Furthermore, for those looking for a complete suspension overhaul, Koni's coilover kits combine adjustable shocks with matched springs, delivering a comprehensive upgrade to a car's handling characteristics.
This wide range of products embodies Koni's commitment to quality and performance across all vehicle types. Each series has been developed with specific use cases in mind, ensuring that whether you're cruising city streets or pushing the limits on the racetrack, there's a Koni shock to enhance your driving experience.
The Art of Adjusting Koni Shocks
How to Identify Your Shock Series
Before you can adjust your Koni shocks, it's crucial to identify which series you're working with. Each shock series is designed with different adjustment features and methods. Identifying your series is straightforward: begin by locating the product label on your shock or strut. This label contains the part number, which is key to identifying the series.
Once you have the part number, you can reference Koni's catalog or website for detailed information about your specific model. This includes the series, adjustment capabilities, and any special instructions for handling. It's important to ensure you have the correct information for your shocks to make accurate adjustments.
For those who have misplaced their documentation or have difficulty reading the label, Koni customer service can assist with identification. Providing details about your vehicle and the shocks' physical characteristics will help them guide you to the correct series and corresponding adjustment procedure.
Understanding Different Adjustment Procedures
Once you've identified your Koni shock series, the next step is to understand the specific adjustment procedures for your model. Koni shocks are typically adjustable in terms of rebound damping, which influences how quickly the shock returns after compression. Some models also allow for compression damping adjustments, affecting how the shock compresses under load.
The adjustment mechanisms can vary from an external knob or dial to an internal method requiring the shock to be compressed. For example, the Koni Sport Yellow line often features an external knob for easy adjustment, while other series may need to be removed from the vehicle for adjustment.
It's also essential to understand the effects of adjustments. Increasing rebound damping can lead to a firmer ride and better handling, whereas decreasing it can make the ride softer. Properly adjusting your Koni shocks maximizes performance and comfort, tailored to your driving preferences and conditions.
The Role of a Part Number
The part number on your Koni shocks is more than just an identifier; it's a gateway to understanding the unique characteristics and adjustment procedures for your specific set. Each part number corresponds to a precise configuration, including the type of adjustment mechanism, the range of damping forces, and the intended use of the shock.
When learning how to adjust Koni shocks, the part number should be your first reference point. It allows you to access detailed instructions and specifications directly from Koni, ensuring that any adjustments you make are accurate and safe for your particular model. The part number also helps in obtaining the correct replacement parts or accessories, should you require them.
In the event of troubleshooting or seeking technical support, providing the part number will enable Koni's customer service to offer prompt and relevant advice. Thus, the part number is an essential piece of information for any Koni shock owner.
Rebound Adjustment Procedure for 26, 28, 30 Series
Steps Involved in Rebound Adjustment
The process of rebound adjustment for the Koni 26, 28, and 30 series shocks involves a few key steps to ensure precise tuning. First, you need to remove the shock from the vehicle if the adjustment cannot be accessed while installed. Once removed, compress the shock fully and then turn it to its original extended position.
For these series, adjustments are typically made at the top of the shock absorber. Depending on the specific model, you may need a Koni adjustment knob or a flathead screwdriver to turn the adjuster clockwise or counterclockwise. Each click signifies a change in the damping force. Turning the adjuster clockwise increases the damping for a firmer ride, while turning it counterclockwise reduces damping for a softer ride.
After making the desired adjustments, check that both shocks are adjusted to the same setting to maintain vehicle balance. Reinstall the shocks to the vehicle, and you're ready to test the new settings on the road.
Common Mistakes to Avoid During Adjustment
Adjusting Koni shocks can significantly improve vehicle performance, but it's important to avoid common mistakes during the process. One typical error is failing to accurately count the number of turns or clicks while adjusting, which can lead to uneven settings between shocks and negatively impact handling. Always start from the fully closed position and count precisely.
Another mistake is adjusting the shocks while they are still on the vehicle, if the model requires removal for adjustments. This can lead to incorrect settings, as the shocks need to be fully compressed to adjust properly. Additionally, avoid using excessive force when turning the adjuster, as this can damage the mechanism. Gentle and firm pressure is sufficient.
Lastly, rushing the adjustment process can result in errors. Take your time to read the instructions carefully, double-check your settings, and ensure that everything is correctly reassembled before driving. Patience and attention to detail are key to successful shock adjustment.
Adjustment Procedure for 76, 80, 82, 86, 87, 88, 90, 8040, 8240 Series
Detailed Procedure for Rebound Adjustment
For Koni's 76, 80, 82, 86, 87, 88, 90, 8040, and 8240 series shocks, the rebound adjustment procedure is methodical and requires adherence to specific steps. Begin by ensuring the vehicle is safely lifted and the wheel is removed for easy access to the shock absorber. For these series, adjustments are typically made without removing the shock from the vehicle.
Locate the adjustment dial or knob at the top or bottom of the shock absorber. Use a Koni adjustment tool or an appropriate screwdriver to turn the knob. Turning the adjuster clockwise increases the damping force, making the ride firmer. Conversely, turning it counterclockwise decreases the force for a softer ride. Each click or notch signifies a minor change, so note the number of adjustments made.
After adjusting, it's critical to match the settings on both sides of the vehicle to maintain balance and handling characteristics. Once the adjustments are made, test drive the vehicle to feel the changes and make further adjustments if necessary. Always consult the product manual for series-specific instructions.
Protecting Your Shocks During Adjustment
When adjusting your Koni shocks, it's important to protect them from potential damage. One critical step is to clean the area around the adjustment mechanism before starting. Dirt and debris can enter the shock during the adjustment process and cause internal damage, so removing any contaminants is essential.
Use the correct tools for adjustment. The Koni adjustment tool is designed to fit the adjuster perfectly, reducing the risk of stripping or damaging the mechanism. If a tool isn't available, ensure that any substitutes fit correctly and won't slip during use.
Be mindful of the shock's exterior as well. Avoid clamping or gripping the shock body with tools that could scratch or dent the surface, which could lead to corrosion or compromise the structural integrity. After adjustments, verify that all components are secure and that there is no leakage of shock fluid.
Following these precautions will help maintain the longevity and performance of your Koni shocks throughout the adjustment process and beyond.
Adjustment Procedure for 8041, 8042, 8241, 8610, 8641, 8742 Series
External Adjustment of Dampers
The 8041, 8042, 8241, 8610, 8641, and 8742 series of Koni shocks are equipped with an external adjustment mechanism, allowing for convenient fine-tuning of the damper's settings. This feature enables quick changes to the rebound damping without the need to remove the shocks from the vehicle or disassemble any part of the suspension.
To adjust these external dampers, locate the adjustment knob usually found at the top of the shock absorber. This knob can be turned by hand or with the Koni adjustment tool. Rotate the knob clockwise to increase the rebound force, which will stiffen the ride, or counterclockwise to decrease the force for a softer ride. The precise clicks you'll feel as you turn the knob represent incremental changes in the damping force.
It is important to make note of the initial settings and the number of clicks adjusted to ensure that both shocks are set symmetrically. Testing the vehicle's response after adjustment is essential to achieve the desired handling characteristics.
Adjusting Damping Forces
Adjusting the damping forces on your Koni shocks directly influences the comfort and performance of your vehicle. For the 8041, 8042, 8241, 8610, 8641, and 8742 series, this adjustment is a precise process that should be approached with an understanding of the desired outcome. More damping (achieved by turning the adjuster clockwise) results in stiffer shock absorption, which can improve handling and reduce body roll during cornering but may also lead to a harsher ride.
Conversely, less damping (counterclockwise adjustment) softens the shock absorption, enhancing ride comfort on rough roads at the expense of some handling sharpness. It's crucial to strike a balance that suits your driving style and the conditions you typically face.
It's recommended to make small adjustments, one click at a time, and then test drive the vehicle to assess the effect. Remember that the front and rear shocks should be adjusted in tandem to keep the vehicle balanced and predictable on the road.
Adjustment Procedure for 8010, 8042, 8210, 8211, 8216, 8242, 8742 Series
Independently Adjustable Series
The Koni 8010, 8042, 8210, 8211, 8216, 8242, and 8742 series shocks feature independently adjustable rebound and compression settings. This independent adjustability allows for a high level of customization to match a driver's preferences or specific driving conditions. For instance, a stiffer rebound setting can be used for track days, while a softer setting can be chosen for everyday comfort.
To adjust these shocks, first identify the separate adjusters for rebound and compression. Rebound is typically adjusted at the top of the shock, while compression might be adjusted at the bottom or via a separate knob or screw. Turning the adjuster clockwise usually increases stiffness, and counterclockwise decreases it.
When making adjustments, it's crucial to alter one setting at a time and test the vehicle's response before changing the other setting. This approach helps isolate the effects of each adjustment and ensures a balanced driving experience. Always consult the shock's manual for the exact adjustment procedures for your specific model.
Tips and Precautions During Adjustment
When adjusting the Koni 8010, 8042, 8210, 8211, 8216, 8242, and 8742 series shocks, it's important to follow certain tips and precautions. First, ensure the vehicle is on a stable surface and that you have safe access to the shocks. Always use the proper tools recommended by Koni to avoid damaging the adjusters.
Adjust in small increments, typically one click at a time, and keep a log of these changes. This documentation helps if you need to revert to previous settings or replicate the setup on another vehicle. Be cautious not to over-adjust, as extreme settings can negatively affect ride quality and vehicle control.
After making adjustments, test drive the car in a safe environment. Pay attention to how the vehicle responds during various maneuvers like cornering, braking, and acceleration. If the adjustments don't produce the desired effect, review your steps and make further gradual changes until the optimal performance is achieved. Remember, safety is paramount, so avoid making adjustments beyond the shocks' designed capabilities.
Fine-Tuning for Optimal Performance
Adjusting Koni shocks is a critical step toward achieving optimal vehicle performance and comfort. As we've explored, each series of Koni shocks offers unique adjustment features tailored to a wide range of driving styles and conditions. Whether you're fine-tuning a classic car with Koni Classic Red and Black shocks or dialing in the perfect setting for track day with the Koni Sport Yellow line, understanding how to adjust your shocks is key to unlocking the full potential of your vehicle.
Remember that adjustments should be made methodically, respecting the manufacturer's guidelines and paying close attention to how changes affect your driving experience. Fine-tuning suspension settings is as much an art as it is a science, and with the right approach, you can significantly enhance your vehicle's stability, comfort, and performance.
Lastly, always prioritize safety, both during the adjustment process and while testing the results on the road. With these principles in mind, you are well on your way to enjoying the renowned performance that Koni adjustable shocks can deliver.